Support and Resistance (S&R) is a very important concept that is used by professional traders in making the entry and exit decisions. Support is just like a floor. When you throw a ball down, it hits the floor and bounces up. On the other hand, resistance is just like the roof. When you hit the roof with a ball, price bouncing down. In the same manner, when price hits a support level, it will bounce up and when it hits the resistance level, it will bounce down. There are many ways to draw support and resistance lines. As a general rule, only the most recent highs and lows are important in the market. Don’t get confused by the highs and lows made by the market many months back. What is important is the recent high and low that has not been broken. In this post, I am going to explain to you how to use EMA 55 and EMA 21 as dynamic support and resistance.
EMA (Exponential Moving Average) is the moving average of the price over a certain period of time. An exponential moving average gives more weight to the recent prices. You should read this article that explains Moving Averages- Simple and Exponential. After reading this article, you should have a fairly good idea how moving averages are calculated. The calculation will be done automatically by the trading platform. You just need to make your concept of moving average clear. This will help you make better trading decisions.
Now, EMA 55 acts as a very good dynamic support and resistance. EMA 55 in an uptrend acts as a dynamic support and in a downtrend it acts as a strong dynamic resistance. Take a look at the following screenshot of EUR/USD Daily Chart at the ellipse that highlights price finding resistance at EMA 55.
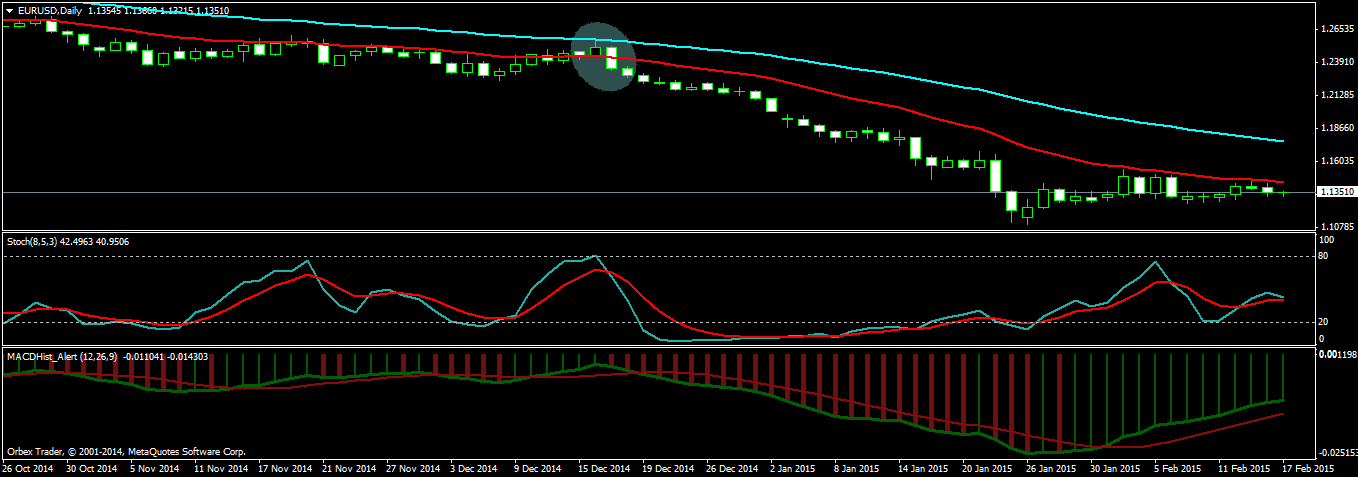
Price found resistance at EMA 55 and after that it fell 1500 pips in the next 25 days. You could have entered into a EURUSD short trade around 1.25104 when the daily candle closed. Your risk should have been 59 pips and that’s all. After 25 days, you could have closed the trade for a profit of 1500 pips. If you had build a pyramid, you could have easily made 3000 pips by opening more short positions and moving the stop loss. We will discuss how to build a pyramid in another post as in this post we are want to show you how EMA 55 acts as a very good dynamic support and resistance.
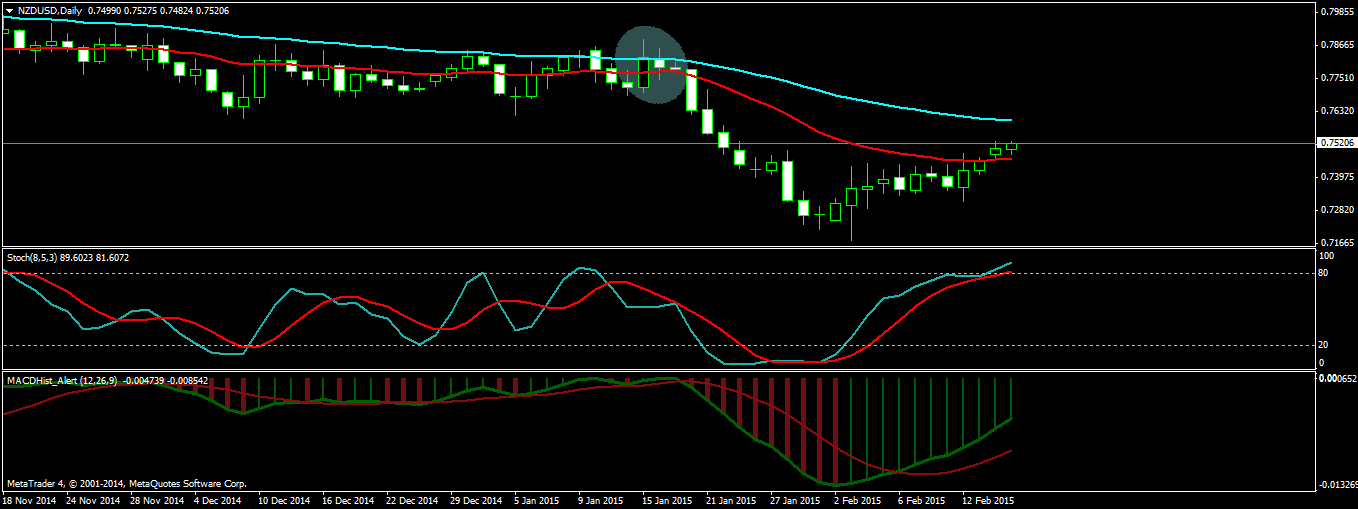
In this screenshot, you have NZDUSD daily timeframe. Once again price is finding strong resistance on EMA 55 NZDUSD Daily Chart. Then you find an inside day pattern which is a solid confirmation that price is going to reverse. You could have entered into a NZDUSD short trade around 0.78000 on the third day. Your stop loss should have been 60 pips. After that you can clearly see in the above screenshot that price fell down to 0.72155 in the next 7 days. So you could have easily made 600 pips in 9 days. If you had build a pyramid and opened more short positions, you could have made 1200 pips in 9 days.
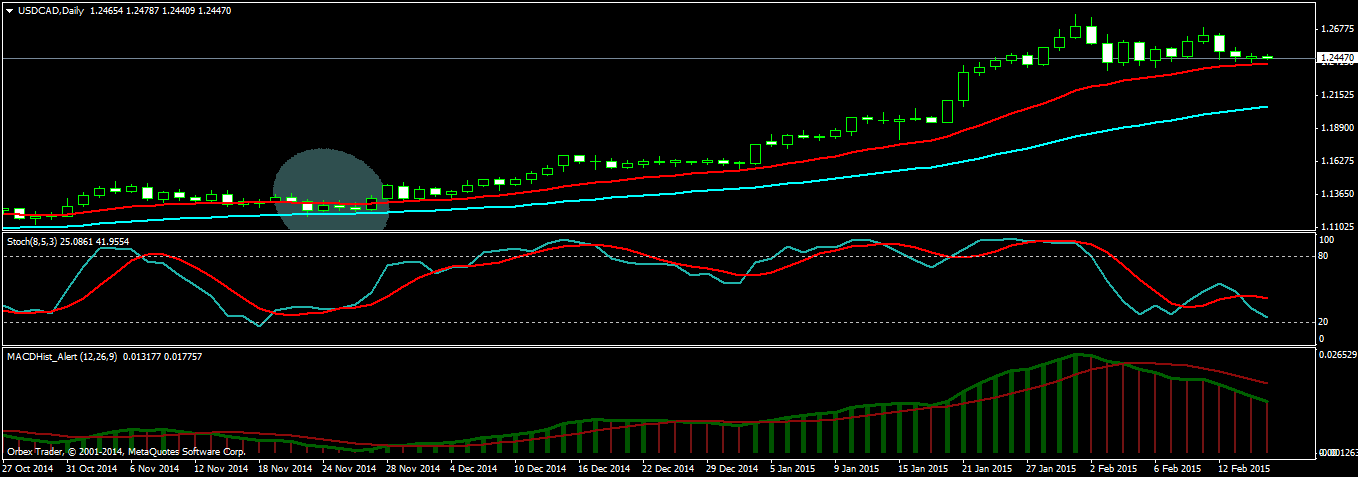
Now take a look at this USDCAD Daily Chart. In this example, EMA 55 is acting as a dynamic support. Price is finding strong support at EMA 55 USDCAD daily chart. You could have entered into USDCAD long trade around 1.12470. Your stop loss should have been 60 pips and in around 46 ( one and a half month), you could have easily made 1500 pips. If you had build a pyramid and opened more USDCAD long positions, you could have made 3000 pips. So you can see EMA55 acts as a very good dynamic support and resistance. On the daily chart, trading signals are less. Now let’s see a few examples on H4 and H1.
This is a screenshot of GBPJPY H4 chart. You can see price is finding strong support at EMA 55. You could have entered into a GBPJPY long trade around 177.712 and your stop loss should have been only 30 pips. In the next 4 days, price moved up 600 pips.
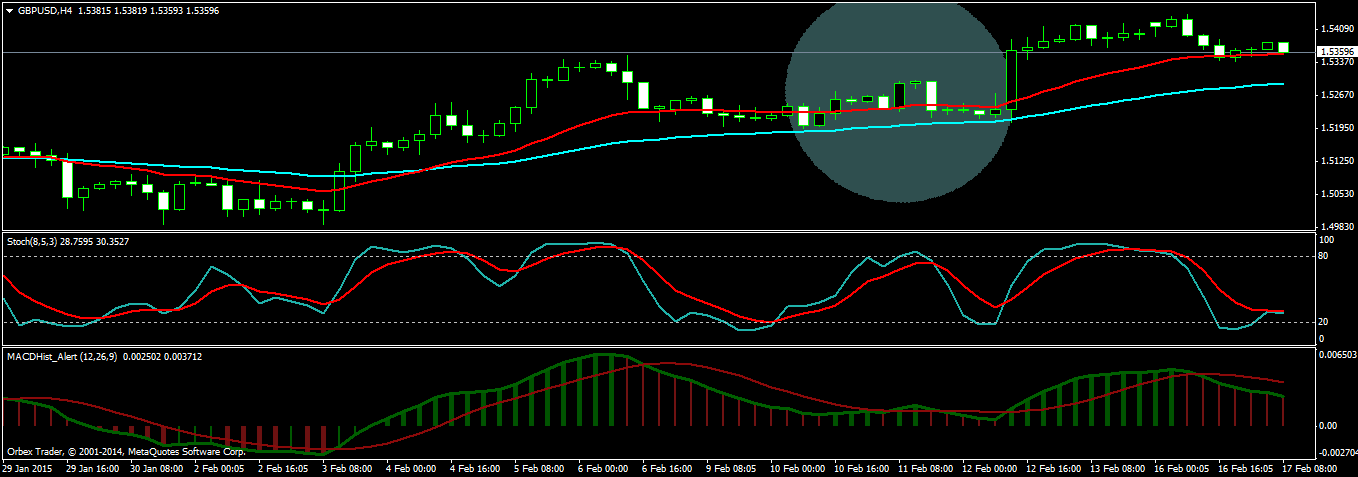
This is a screenshot of GBPUSD H4 timeframe. Once again you see price is finding strong support at EMA 55. You could have entered into a GBPUSD long trade around 1.52255 and your stop loss should have been 40 pips. In the next 3 days, price moved up 200 pips. So you could have easily made 200 pips in 3 days. You could have opened more GBPUSD long positions and build a pyramid and made 400 pips.
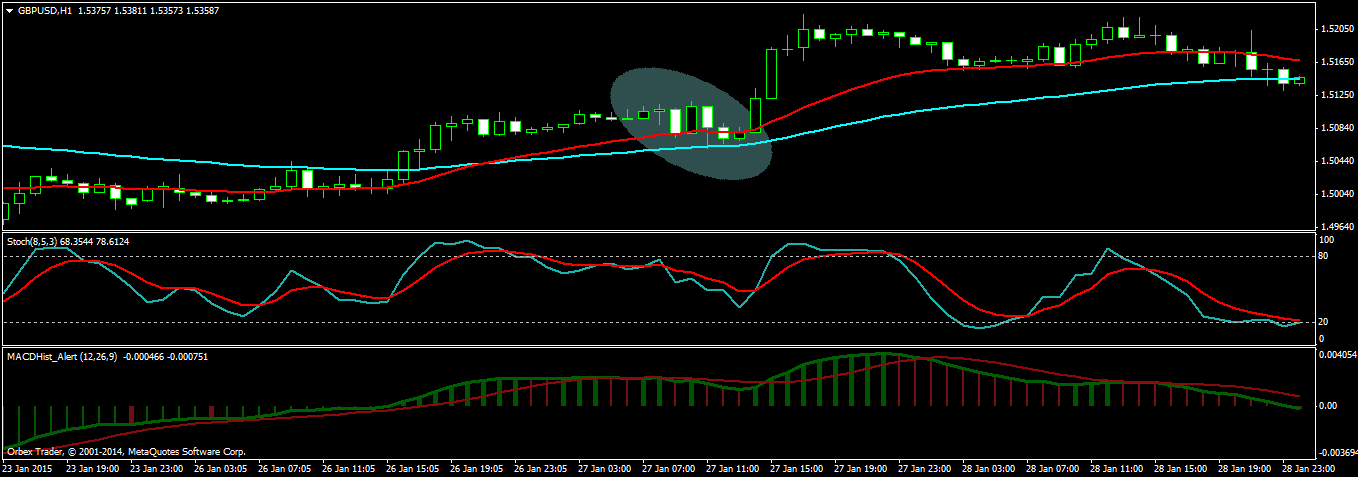
This is a screenshot of GBPUSD H1. In this screenshot, you can see price finding strong support at EMA 55 GBPUSD H1 timeframe. If you had entered into a GBPUSD long trade around 1.50726 and your stop loss should have been only 20 pips. In the next 5 hours you could have easily made 200 pips.
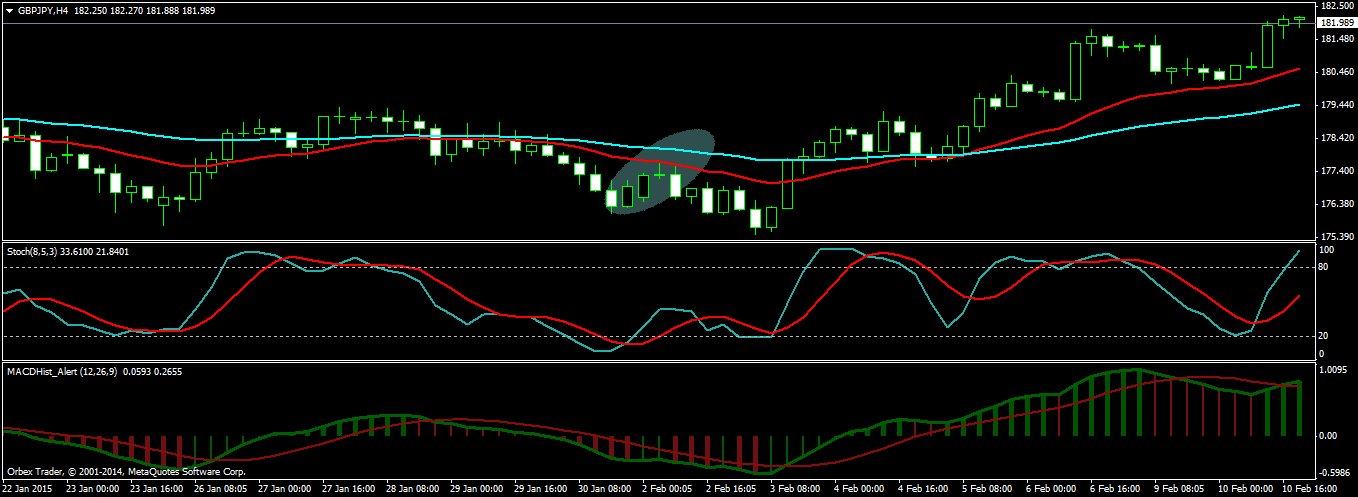
This is a screenshot of GBPJPY H4 once again. In this screenshot, you can see price finding resistance at EMA 21. You could have entered into a GBPJPY short trade 177.300. Your stop loss would have been only 50 pips. In the next 12 hours, you could have easily made 120 pips.
As a general rule, when price bouncing from EMA 55 on Daily timeframe it is a much strong signal as compared to when it bounces on H4. In the same manner when price bounces from H4 timeframe it is a much stronger signal as compared to when it bounces from H1 timeframe. So on the daily chart you can use EMA 55 to easily catch a 1000 pip move. On the H4 chart, you can use EMA 55 to catch a 200-400 pip move and on H1 timeframe you can use EMA 55 to catch a 100-200 pip move. We have also shown you how to use EMA 21 in finding support and resistance levels in the market. Use both EMA 55 and EMA 21 to find dynamic support and resistance in the market. With EMA 55 and EMA 21, you don’t need to draw any trendlines. These 2 EMAs work very well in finding good support and resistance in the market.
Nice one there, especially that it has low risk stoploss unlike what the higher timeframes are known for.
However,the spice missing in this post which would have made everything more juicy is the exit point / takeprofit.
You would agree with me that exits are as relevant as the entries. In fact, the poor exits can make a good trade result into loss.
Good comment Jonathan. Yes exit is as important as the entry. There is no take profit here. For the exit I use the MACD indicator that you can see in the screenshots. In the downtrend, I will keep the trade going as long as the MACD is red. When MACD changes color from red to green, I close the trade. In the same manner, in an uptrend I will keep the trade going as long as MACD is green. When MACD changes color from green to red, I close the trade.
Ok. But I would prefer macd (8,21,8) signal line crossover in opposite direction because histogram bar change colours can be deceptive; it might make us get out too soon while the move continues.
Yes, true. This will happen. Your comment is an indication that you are on your way to become a very good trader. Market will practice deception again and again. If you close the trade early, don’t worry. Get in again. Good that you pointed out histogram color changes sometimes then it again changes back on the next bar. You can see that happening in the screenshots also. Just don’t be greedy. Close the trade when the color changes. When the retracement is over again get in. This is what I do. Don’t try to hang onto a trade for too long. Just now I was trading GBP/JPY. It went down 250 pips in 10 hours. Then suddenly it changed direction and is now up 150 pips within 1 hour. So always be careful with the market. Don’t think you can squeeze every pip out of the market.
Thanks for the encouraging comment. I am highly motivated.
I guess the move on GBP/JPY was due to the news release on GBP about Retail Sales m/m at 9.30 GMT.
Also, JPY pairs are known for their erratic nature.